Web: www.fishfotoworldwide.com -- E-Mail: fish@fishfoto.com
24/01/08 - Dealing With Customs & Immigrations and Camera Equipment - Reality & Legally
A few days ago was checking my mail I got a nice e-mail from an editor at Popular Photography asking if I could write a response to one of their readers. Naturally I sat down and wrote back that I'd love to answer some questions on travel for Popular Photography's readers.
The following is the question I was forwarded, with the name of the original author removed
-- -- -- --
START
-- -- -- --
Read you response to A. Aronowitz about insuring his equipment to Peru -- good advice, but it begged an unasked question: Will he have a problem bringing his equipment back into the US?
The reason I ask: Back in the 70s and 80s, I had a job that frequently took me to some exotic international locations. I'd always bring my Nikons and lenses (who wouldn't?). Before my first trip, a friend advised to bring receipts with the equipment, or bring it all to the nearest US Customs -- They'd provide a form indicating they saw the equipment here, first. Never once did I not ease through customs -- They'd ask if I bought the stuff overseas, I'd show 'n' tell, done.
My question above -- or similar -- my be useful to a lot of readers...
Michael S.
-- -- --
END
-- -- --
I carefully read over the question a few times, because traveling internationally with camera equipment can be tricky. There are the legal rules of traveling internationally with photo equipment; there are huge grey areas regarding traveling internationally with camera equipment; there is the actual day-to-day reality of traveling internationally with camera equipment. Weighing all the options I laid out my answer for the readers of Popular Photography.................you don't have to wait until February like the Popular Photography's Blog readers, you can read it now!
-- -- -- --
START
-- -- -- --
Michael
Travelling internationally with camera equipment can be easy 99% of the time and tricky 1% of the time.
Over the past few years I have travellled as a professional photographer around the world with my equipment, always with at least two professional digital bodies and a minimum of four lenses. My trips generally raise red flags, but my equipment is almost never screened by U.S. Customs (although I get screened by U.S. Immigrations). These trips include multiple trips to Hong Kong for less than 24 hours; traveling to Basrah Iraq for six hours; an assignment in Kuwait City for less than three hours on the ground; flying to Frankfurt for a CEO shoot for less than 8 hours on the ground; and a five day journey where I exited the U.S. and traveled to Tokyo, Hong Kong, Vancouver (for 58 minutes), Hong Kong (again), Paris and finally landing back in New York.
With this said, I have only once been stopped from reentering the United States with my equipment. I was stopped after flying from Hartford, CT, to Tokyo, Japan, for less than two days in Tokyo. This incident occurred at Atlanta's Hartsfield-Jackson International Airport. I was stopped by U.S. Customs after being flagged by an Immigrations Inspector and pulled aside for about 10 minutes. In this 10 minutes I was asked where I was and why I was there and my documents were inspected. I answered the Inspector honestly and my bag, a fully loaded Think Tank Airport Addicted Backpack was hand searched and then released to me. Upon questioning what Customs was looking for I was informed that they were looking for anything unusual in my equipment; however, since all of my equipment was clearly labeled with my identification labels and a uniform identification mark (bright coloured tape and some gaffers tape) they could safely assume that all the gear that left the country returned with me and that I had not acquired any new, undocumented equipment.
In theory, you should always travel with a "Carnet." A carnet is generally prepared by the US Council for International Business, and is validated by the US Customs Service. A carnet guarantees that what you are bringing into a foreign country, you will be taking home from that foreign country as well. Having a Carnet should exempt you from certain taxes in the country you are traveling to and verifies that what you are returning to the US with what you departed with.
Generally a Carnet is valid for one year and is 40% of the total value of what you are traveling with. With most carnet's you should pay a 1% bond on the 40% value of the items you are traveling with. While I do not know any requirements for a person on vacation or a hobbyist to obtain a carnet, a good place to obtain a carnet is www.shoots.com
When in doubt travel with your gear list and serial numbers for both insurance and Customs reasons. You should keep a copy of this information in your travel documents file, as well as in your gear bag. In reality unless you are loaded for a full location production shoot you should be just fine coming home with all of your equipment and the full expectation of a US Immigrations Inspector looking at your passport, smiling and saying "Welcome Home."
Hopefully this answers your question.
-Steven Frischling
www.flyingwithfish.com
fish@flyingwithfish.com
-- -- --
END
-- -- --
Happy Flying!
24 January 2008
21 January 2008
Two Single Day No Jet Lag Photo Quick Course Seminar & Workshops Now Available! - Reserve Your Seat Today!
Web: www.fishfotoworldwide.com -- E-Mail: fish@fishfoto.com
21/01/08 - Two Single Day No Jet Lag Photo Quick Course Seminar & Workshops Now Available! - Reserve Your Seat Today!
March 15 - Baltimore/Washington Area
March 16 - Manhattan
The No Jet Lag Photo Quick Course is a one day intensive seminar and workshop designed to educate photographers on a wide range of skills and tools to make life on the road easier.
Having traveled around the world, as an editorial and corporate photographer my experience, and knowledge base as a traveling photographer is extensive. I have learned to handle any situation I am faced with and fully understand that whatever obstacles I may encounter are not my client's problem.
During the seven hour No Jet Lag Photo Quick Course you will learn the basics of travel through how to handle a wide range of real-world scenarios. Throughout the day I will cover a vast expanse of information ranging from choosing flights and fares to traveling with minimal equipment to photographing a corporate environmental portrait.
As I explain real-life situations I will also be demonstrating some of these skills on-site, such as the five minute corporate portrait and flying with a full camera, lens and lighting kit as carry-on baggage only.
Towards the end of the day we will go out in the city streets and put the information you have learned to the test! There is no point in just taking notes if you are not shown how to implement the information you have just learned. Try out your new skills while the information is still fresh in your head.
Some of the topics to be discussed in detail include the following
- Understanding the logistics of planning your travel
- Planning your "escape route" should your travel schedule be interrupted
- Learning to select your equipment based on "need" not "want"
- Learning to pack more effectively and efficiently
- Choosing "savings" over "comfort" (and vise-versa)
- Planning to maximize your effective time on the ground
- Creating the five minute editorial/corporate five minute portrait
- Planning multiple quick set-ups with minimal gear for editorial/corporate shoots
- Understanding how to work in any available space
- Understanding that how to deal with "reality" rather than "artistic vision" on deadline
- Learning to use the streets as your friend while shooting alone or with an assistant
Currently I will be holding two No Jet Lag Photo Quick Courses.
March 15 2008 in Baltimore/Washington Area
March 16 2008 in Manhattan
The fee for this seminar & workshop is $149
Full-time students may attend the seminar for $125
Interested in attending? Drop me an e-mail at fish@flyingwithfish.com
PayPal payments may be sent to Paypal@fishfoto.com. Indicate the date in the notes section of payment form to hold your seat. Register early as there are a limited number of seats available.
The Mountainsmith Tour - Part 5 - Traveling The Globe In Two Small Bags
Web: www.fishfotoworldwide.com -- E-Mail: fish@fishfoto.com
21/01/08 - The Mountainsmith Tour - Part 5 - Traveling The Globe In Two Small Bags
What do you get when you pair the Mountainsmith Tour with the Mountainsmith Day? One of the lightest, most flexible bag combinations for traveling light!
Most photographers over pack for travel. A simple overnight trip can often result in a large rolling camera case, a backpack and a full-sized checked bag. There are times you need to pack like this, but you can also scale down what you need, pack entirely based on "needs" not "wants" and do a lot with a very small packing kit.
In a few weeks I will be leading a workshop taking a small group of photographers over to Hong Kong to photograph the Chinese New Year. For me, this will require approximately 18,000 miles of flying over a three day span. I will shoot extensively in Hong Kong on February 7th and 8th, including an engagement session, then photograph an engagement session in Vancouver, British Columbia, on the 8th of February. Sounds like a packing and logistics nightmare? Not at all.
I have chosen my packing to be complete, compact and light and can carry everything I need in the Mountainsmith Tour and the Mountainsmith Day packs. Both bags can hold a remarkable amount of things in a very small space.
The following is everything that will be packed into the Mountainsmith Tour and Mountainsmith Day packs for the No Jet Lag Intensive Photo Workshop
--Camera Gear--
2 - EOS 1D series bodies (carried on my shoulders, each with a lens)
3 - Spare 1D batteries
1 - 14f2.8
1 - 24f1.4
1 - 50f1.4
1 - 85f1.2 (may be swapped for the 85f1.8)
1 - 70-200f2.8
1 - Modified HolgaLens
1 - 580ex
4 - Spare CF Cards
1 - ETTL Off Camera Cord
1 - Photoflex compact 22" reflector gold/white
8 - Spare "AA" batteries
1 - Mini-roll of Gaffers Tape
--Electronics--
1 - Apple MacBook 13"
1 - APC emPower inverter
1 - Canon 1D battery charger
1 - Apple MagSafe Power Supply
1 - Lexar CF Card Reader
1 - USB Phone Charger
1 - USB 2.0 cord
1 - iPod Video
1 - Set of Sennheiser Noise Canceling Headsets
1 - Sleeve of 10 DVDs
1 - 1gb JumpDrive
1 - Compact/Credit Card International PowerTip converter
1 - 3-slot power adapter
2 - Spare "AAA" batteries
--Misc--
2 - Shirts
2 - Pairs of boxer shorts
2 - Pairs of socks
1 - Toothbrush
1 - Mini-container of Gold Bond Powder
2 - Mini-packs of baby wipes
1 - Right Guard deodorant stick
2 - TSA Approved combination locks
Anything else I will need will be worn or carried, such as pants, belt, wallet, passport, etc etc.
The three photos below show everything laid out next to the Mounatinsmith Tour and Mountainsmith Day packs, as well as the two packs full packed up.
If you are interested in the No Jet Lag Intensive Photo Workshop, Feb 5 to Feb 8, there are a few seats still available. You can learn more about this workshop at www.comeflywithfish.com . I will be holding two single day No Jet Lag Workshops on March 15 and March 16 in the Baltimore/DC area and New York City for those interested in learning the "nuts-n-bolts" of traveling as a photographer. For more info drop me an e-mail at fish@flyingwithfish.com
Happy Flying!
-Fish
--Click The Images To Enlarge Them--


19 January 2008
The Mountainsmith Tour - Part 4 - Shooting Portraits While Walking The Streets Bag
Web: www.fishfotoworldwide.com -- E-Mail: fish@fishfoto.com
19/01/08 - The Mountainsmith Tour - Part 4 - Shooting Portraits While Walking The Streets Bag
There are times shooting when my waist pack needs to carry some lenses, some lighting gear, a few batteries, and allow me to quickly work out of it. The obvious bag of choice for me (most of the time) is the Mountainsmith Tour.
My "shooting on the run" set up is a mix of gear that allows me to handle a wide variety of situations with a minimal amount of equipment. This kit often goes out for quick location portraits or engagement sessions being shot in totally uncontrolled environments. Generally these uncontrolled environments are out in the street, in a very busy and public building or needing to light a shoot, while walking with my subject. By carefully choosing my equipment and knowing how to maximize the available space in the Mountainsmith Tour I can carry a wide variety of equipment around my waist, while keeping a small "footprint" while shooting.
When working on the street, or in an uncontrolled environment, the less space you occupy, or smaller footprint you create, the more maneuverable you become. Maneuverability equates to flexibility in shooting, which allows for a much more fluid shooting style, especially when working alone.
The most common setup for this kit includes the following
- Two Canon 1D bodies (on my shoulders)
- Canon 14f2.8L
- Canon 24f1.4L
- Canon 50f1.4
- Canon 85f1.2L
- Canon 70-200f2.8L (In attached Newswear Press Pouch)
- Canon 580ex Speedlight
- Canon ETTL Off Camera Cord
- Two Spare 1D series batteries
- Four spare "AA" batteries
- Think Tank Pixel Pocket Rocket (CF Card Wallet)
- Photoflex 22" LiteDisc Reflector , Gold/White
- Small roll of Gaffers Tape
By working with smaller prime lenses I find I able able to be more flexible in my packing options. This flexibility in packing allows me to work "differently" such as carrying a small, easy to handle, reflector that I can fold up and stuff in my waist pack. The beauty of the Photoflex 22" LiteDisc is that it can opened quickly, held in my left hand to direct the light while holding my cameras up with my right hand and shooting at the same time. Yes an assistant would be easier, but I generally work alone, so my kit is designed to allow me multiple options while only being able to rely my skill of working alone.
Below is a photo of my general set of up this kit.
Happy Flying!
--Click The Images To Enlarge Them--


17 January 2008
The Mountainsmith Tour - Part 3 - The Compact Road Warrior Lighting Kit
Web: www.fishfotoworldwide.com -- E-Mail: fish@fishfoto.com
17/01/08 - The Mountainsmith Tour - Part 3 - The Compact Road Warrior Lighting Kit
While working on the road there are many situations that require me to light quickly and on the run............and my Mountainsmith Tour provides me a packing option that is perfect for working quickly and effectively.
As much as I'd often like the opportunity to set up a full lighting kit for many of my subjects, or at least be able to set up a carefully planned small lighting set up, this is not always possible. Many of my shoots need to be shot quickly, with little-to-no planning in regard to location and this leaves me with the old reliable "single light stand-by" option.
The "single light" set up is an extremely common set up among news and editorial photographers. It is not always the most ideal set up, but it is done for a variety of reasons, the most common being that it can be done quickly. You're waiting for a very high profile person, once they arrive you are told you have 5 minutes (which really means 2 minutes) and you are told where to set up and given 5 minutes to do so. These can be frustrating situations, but I have learned to plan for these situations. The constraints placed on me are not my client's problem, they just need the photographs, and it is my job to provide these images regardless of obstacles.
With the need to create a very small, very unassuming, ultra portable lighting kit, I have adapted my Mountainsmith Tour bag to meet my most basic lighting needs. This kit makes my "stripped down" kit look complex, but it gets the job done. This configuration of the Mountainsmith Tour can be carried on the plane, worn around your waist with two cameras on your shoulders and easily be set up and torn down in less than five minutes anywhere...........it is my "Road Warrior Single Light Kit".
The following equipment makes up my "Road Warrior Single Light Kit":
- Nikon SB-28dx
- Calumet Swivel Adapter
- PhotoFlex Speedring
- Pocket Wizard Transmitter
- Pocket Wizard Receiver
- PC Cord
- 2 "AA" four packs
- Roll of Gaffers Tape
- 22" Photoflex LiteDisc
- Maglight MiniMag Flashlight
- Bogen 3373 Compact Light Stand
- (often added and not pictured : Photoflex Q39 Small Softbox)
All of this gear fits neatly inside the Mountainsmith Tour (including the Photoflex Q39 Softbox that is not pictured). The Bogen 3373 Compact Light Stand is attached to the Mountainsmith Tour by the bags strap system under the bag.
If you are interested in learning more about single light set ups, you need to check out Neil Turner's web site www.dg28.com
For those interested in learning a wide variety of small light shooting concepts and techniques, I strongly suggest visiting The Strobist at www.strobist.com . The Strobist is the most comprehensive source anywhere for using small strobes and learning to maximize the potential of your small strobe capabilities.
Below are some photos of my Mountainsmith Tour and the gear that makes up my "Road Warrior Single Light Kit." Even with all the gear pictured below (and the often added, but not pictured Photoflex Q39 Softbox) the pack has enough room for other items you may want to add. I have packed all this, plus tossed in an additional small lens (like the 50f1.4 , 85f1.8, 12mm macro extension tubes) and lashed on a Gitzo 0012 tripod with no problems in regard to space, weight and maneuverability.
Happy Flying!
--Click The Images To Enlarge Them--


16 January 2008
The Mountainsmith Tour - Part 2 - The General Purpose Pack
Web: www.fishfotoworldwide.com -- E-Mail: fish@fishfoto.com
16/01/08 - The Mountainsmith Tour - Part 2 - The General Purpose Pack
Like most photographers I have used many bags for many purposes, but I always return to the Mountainsmith Tour as my "general purpose" pack. My love affair with the Mountainsmith Tour started many years ago while covering the National Football League (NFL) with the now ancient Nikon/Kodak NC2000c and Nikon D1 (just for reference I switched to Canon in 2002).
The slim profile of the Mountainsmith Tour coupled with it's sizable storage capacity, it's incredibly durable construction and mostly weather proof design made the pack ideal for covering sports in the New England winter. The more I used the pack for sports, the more I adapted it to a general purpose pack and it has no evolved into my "go to" bag.
As a general purpose bag I tend to use a variety of set-ups, which always revolves around what equipment is needed. Rather than write up a dozen potential set-ups of the Mountainsmith Tour I'll address my use of the bag, for general shooting on a broad level.
My equipment needs for news, corporate work, weddings and even a long weekend away with my family is generally very similar. I try and work as simply as possible, carrying as little as possible, maximizing the potential options with a minimum amount of weight.
A typical set up walking out the door is two cameras on my shoulders, three lenses in the Mountainsmith Tour, basic accessories and a Newswear Large Press Pouch. While I like using a Domke 3-slot insert with the Mountainsmith Tour I often go without the insert. I make sure I use lens caps to protect my glass. I am not overly worried about lenses rubbing against each other or having superficial cosmetic scuffs on the barrels of the lenses.
To add to the Mountainsmith Tour's versatility and comfort I attach a Newswear Large Press Pouch. The Newswear Pouch is secured with a small carabiner, that also holds a strap for a small roll of gaffers tape.
A typical set up for the Mountainsmith Tour for news or general assignments is the following:
- Canon 580ex Speedlight
- Canon 28-70f2.8L (reversed lens hood)
- Canon 50f1.4 (lens hood affixed)
- Canon ETTL Cord
- 3 spare EOS 1D batteries
- 2 packs of four "AA" batteries
- Maglight Mini-Mag flashlight
- Think Tank Pixel Pocket Rocket (CF Card Wallet with 10 CF Cards)
............on my shoulders walking out the door will be to EOS 1D series bodies with 16-35f2.8L and 70-200f2.8L
A typical set up for the Mountainsmith Tour for weddings or corporate assignments is the following
- Canon 580ex
- Canon 14f2.8
- Canon 50f1.4 (lens hood affixed)
- Canon 70-200f2.8 (in Newswear Pouch with Nikon HN-28 screw in lens hood)
- Holga Modified lens
- Canon ETTL Cord
- 3 spare EOS 1D batteries
- 2 packs of four "AA" batteries
- Maglight Mini-Mag flashlight
- Think Tank Pixel Pocket Rocket
.....................on my shoulders is usually two Canon EOS 1D bodies with 24f1.4L and 85f1.2L.
What I carry varies depending on my needs or wants at any moment for any job. I can end up with a 16-35f2.8, 24f1.4L and 24f3.5 TS-E (tilt shift) in the bag depending on the job........and yes it is unusual to walk out the door with three 24mm focal length lenses at the same time, but it has happened for specific shoots.
Below are photos of these two common set ups for a "General Purpose" set up of my Mountainsmith Tour bag. The photos show the Mountainsmith Tour bag laid out next to all the gear, as well as the bag with all the gear packed in it.
Happy Flying!
--Click The Images To Enlarge Them--


15 January 2008
The Mountainsmith Tour - Part 1 - The Perfect Travel Companion
Web: www.fishfotoworldwide.com -- E-Mail: fish@fishfoto.com
15/01/08 - The Mountainsmith Tour - Part 1 - The Perfect Travel Companion
One of the most common problems all photographers face is the "search for the perfect bag." We all clamor for that one bag that will solve all our problems, I have more than a dozen "perfect bags." Over the years I have come back to one bag over and over and over again, the Mountainsmith Tour.
This week Flying With Fish is dedicated to the Moutainsmith Tour and the multiple ways I have used, adapted and pack this bag, from a news/sports/wedding bag, to a lighting kit bag to a "wow it can haul that also! "bag. I have owned three of these bags, currently owning two of them, and have also started to use the Mountainsmith Tour's slightly larger sibling the Mountainsmith Day bag. In fact, if possible, I plan to try and travel approximately 18,000 miles over three days, shooting in two countries, on two continents, with just the Mountainsmith Tour and Mountainsmith Day next month!
Before we kick this week off of the Mountainsmith Tour off, let me go over the basics of the bag and why I love it.
1) The Mountainsmith Tour is a near perfectly designed lumbar bag. It sits comfortably on my body no matter what he weight load
2) The waist strap has two independent adjustment straps to allow me to change the angle of the bag for more comfort as I work
3) The pack has a bright yellow interior making it almost impossible to lose anything inside the bag
4) The main pocket has a small zipper pouch to store smaller items in their own area
5) The exterior pocket has a small "clip-strap" to attach small items, such as a CF card wallet, securely in your bag
6) The pack has an optional shoulder strap which is great at times when you want extra support
7) The pack's waist straps can be tucked in an hidden for use as a shoulder bag
8) The rear padding has a small pocket built in to quickly stash items, such as a CF card wallet while shooting or an airline ticket while going through security
9) The nylon construction of the bag is nearly indestructible (I had one die, my dog ate it after I left a candy bar on it, I can't fault the bag for my dog's munchies)
10) The Mountainsmith Tour (and Mountainsmith Day) are available in Recycled Materials! That's right the bags are made up from approximately 13-to-16 plastic bottles! Mountainsmith estimates that the Recycled Tour & Day pack saved about 1.1million bottles from going into the landfills in 2007!
Below are three photos of my two Tour packs. I use a Pink one (my daughter Lauren chose it for me) and a black one (for those slightly more formal occasions). The photos show an overall view of the packs, the yellow interior and the proud recycled logo!
Happy Flying!
--Click The Images To Enlarge Them--


13 January 2008
Fly Hello Kitty On Eva Air - A Flight Your Kids Will Love!
Web: www.fishfotoworldwide.com -- E-Mail: fish@fishfoto.com
13/01/08 - Fly Hello Kitty On Eva Air - A Flight Your Kids Will Love!
If your kids are like mine the love Hello Kitty. Lauren, 7, and Max, 3, love Hello Kitty (Simon will be 1 in a few weeks, we're not sure if he loves Hello Kitty yet).
For those who love Hello Kitty Eva Air (長榮航空 ) is a Taiwan based international airline that offers a unique service on a few specific flights between Taiwan (TPE) and select cities in Japan (with an all Hello Kitty flight on a two Airbus A330-200 aircraft. What makes this service unique is that not only are the aircraft painted with Hello Kitty and her friends on the outside, the service on the aircraft is also Hello Kitty themed! Hello Kitty movies, Hello Kitty on the boarding pass, Hello Kitty on the seats, Hello Kitty wall patterns, the flight attendants even wear Hello Kitty aprons and ribbons for these flights!
I know, most of you folks who read Flying With Fish are not based in Taiwan or Japan, but if you are, your kids will love it. Planning on flying to the region with your kids? Maybe book a flight on one of these routes. If I could, I'd love to bring my kids over just for the experience of flying with Hello Kitty.
To learn more about these flights check out http://evakitty.evaair.com
Below I have embedded a video of Eva Air's second Hello Kitty Airbus A330-200 being painted in the full Hello Kitty livery. Maybe you can't fly the flight, but your kids might like watching this 5 minute video. Mine have watched it dozens of times!
Below the video is a photo of Lauren & Max enjoying their Hello Kitty marshmallow lollipops this evening after dinner.........
Happy Flying!

12 January 2008
Flying With Kids - Some Basic Tips
Web: www.fishfotoworldwide.com -- E-Mail: fish@fishfoto.com
12/01/08 - Flying With Kids - Some Basic Tips
Anyone who has a child over the age of 6 months and under the age of 12 knows that flying with their kids can be a challenge.
While there are no perfect answers for traveling with your kids, there are some basic tips which I have practiced while flying with my kids on transcontinental flights and while observing families in transit.
--Pre-Boarding--
I think a good place to start is the myth of pre-boarding. Some airlines have stopped pre-boarding families, and while this is irritating, it may not be as bad as you think. For longer flights, or flights on larger aircraft pre-boarding with an excited child can add a half-hour or more to your time on the plane. This is time that your child can be up and walking around in the gate area burning off their energy.
If you are flying on a commuter flight or a smaller aircraft, like a regional jet, Airbus A318 or Boeing 737-400 your boarding time won't be that long, so pre-boarding may not be a bad option. If you are flying an airline that has no-assigned seats, such as Southwest Airlines (WN) I strongly suggest pre-boarding.
If you are flying a medium-haul flight or long-haul flight or are flying on large aircraft like a Boeing 747-400 or Airbus A340-500, keep your kids happy and off the plane as long as possible. You can ask if you can be accommodated with a lower boarding zone on your boarding pass, but the longer your kid is not forced to stay in their seat the better off you'll be.
--Snacks--
For those of you flying in flights longer than one hour bring your kids favourite snacks. I know this sounds basic and like a no brainer, but I heard kids screaming for a cookie or a cracker often on flights. Yes, the flight should be stocked with snacks, but many are not well stocked. I have been on flights where the only snack is peanuts (and I am deathly allergic to peanuts) which leaves kids hungry. On one memorable flight from Atlanta (ATL) to Los Angeles (LAX), a 5 hour flight. I was in the last row of first class on a flight and the child, maybe 3 years old, in the first row of economy seats behind me was screaming for a cookie, the mother politely asked for a cookie and she was informed that the cookies were "only for the first class passengers." This really annoyed me and I ended up asking the flight attendant for the snack basket, took out a few packs of cookies and brought them to the mother for her child.
Now since I know this can be a serious problem, and the in-flight crew maybe unable to assist or in some cases unwilling to assist, I strongly suggest packing as many snacks as you think your chid could possibly consume during the duration of the flight.
--Entertainment--
An occupied child is a happy child, at least this has been my experience. My experience comes from not only flying with my kids, but also frequently wandering around planes on long flights front to back, sort of doing laps, just to kill time.
If possible, try and a choose a flight that offers in-seat power. While I do not generally fly American Airlines (AA), they offer in-seat power on every one of their mainline aircraft in economy (not in every seat, but reservations can tell you which seats offer the DC power outlets in the seat or row). Many other airlines are adding in-seat power to their fleets in economy or their "premium economy" section so keep this in mind when selecting your flight.
With the cost of portable DVDs players dropping, and the low cost and light weight external batteries being easy to find, pick one up and pack your kids favourite DVDs. A few good DVDs can keep a kid occupied for a long time on a long flight. Get your kids some headsets and they'll be quiet and in their own little world.
If you have a young child consider Crayola's triangle shaped crayons. I suggest these because they won't roll off the seat-back tray and onto the floor. This will make your kid happier and cut down on your need to search under the seats for a few missing crayons.
--When to fly--
Flying with kids is rarely convenient to "your schedule," so consider selecting a long flight that matched your child's bed time.
Leaving Las Vegas (LAS) for New York (JFK)? Check out the 9:20pm rather than the 7:30am. Headed from London (LHR) to Hong Kong (HKG)? Look at the plethora of flights around 9:00pm rather than those 12 hour flights departing around 12:noon.
Choosing better flight times to allow your kids to sleep can allow everyone on the flight to have a better more enjoyable travel experience.
--Packing--
Make sure you child's bag is on they can carry on their own. if they have a favourite stuffed animal, make sure it fits safely and securely in their carry on, not with it's head popping out of the top! If they cannot haul their own carry on you'll be hauling it along with your carry on and checked baggage and that's just no fun!
--At The Airport--
Waiting in line with kids is never fun. I have three, luckily one is only currently barely walking, the other two are like puppies, off and running in two directions. I strongly suggest figuring out the costs of a good tip for the Red Caps/SkyCaps at the airport curb side c heck in and having them handle your baggage for you, then have them hand you your boarding passes and go get in the security line.
This is by no means a perfect list for traveling with kids. Everyone's kids are different, not everyone has the same number of kids (or any kids at all) or kids of the same age, so this is just an overall suggestion of ways to make traveling with the kids easier.
If you have any suggestions I'd love to hear them! Comment below or drop me an e-mail at fish@flyingwithfish.com
Below is a photo I shot of my kids Max & Lauren back in April of 2006 on-board Southwest Airlines (WN) Flight 416 from Las Vegas (LAS) to Providence (PVD). We got a Bulkhead with pre-boarding (yes, sometimes pre-boarding is a good thing, especially with an airline like Southwest that has no assigned seats), tucked them in on the floor and they watched movies until they fell asleep.
Happy Flying!
............oh yea, swing into the magazine shop and pick your kids up a toy plane of the airline they'll be flying on. They seem to love it!
--Click On The Image To Enlarge It--

11 January 2008
Don't Let The Airlines Lose Your Bags .........Or If They Do, Get Reunited Quicker!
Web: www.fishfotoworldwide.com -- E-Mail: fish@fishfoto.com
11/01/08 - Don't Let The Airlines Lose Your Bags .........Or If They Do, Get Reunited Quicker!
Over the past few days there seems to have been a spate of photographers who have become separated from their luggage while traveling. Maybe the Moon and the Stars have been perfectly aligned to cause this rash of photographer baggage problems. Maybe it's just that while only an average of .005 bags are delayed, misrouted/lost while in transit, with millions of bags in transit per day, that's still 5000 bags per million bags per day!
While you cannot prevent an airline from delaying or misrouting your bags, you can make it easier for the airlines to reunite you with your baggage. How? Simple........label your bag in multiple places and make your bag easily identifiable. Telling the agent that you have lost your 21" black ballistic nylon bag is not going to get your bag found in a sea of black ballistic nylon bags.
When you get your bag ready to go on the road you need to be redundant in your labeling. If you can get a monogram on the bag, get a monogram on your bag as well (Mine is monogramed with "Fish"). I also strongly suggest marking your bag in a bright unique way.
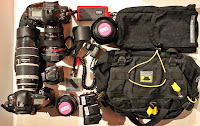
My bags are generally easy to spot, as mentioned in the entry Mark Your Camera Equipment & Never Leave Anything Behind, which I posted a few days ago. However, easy to spot bags do not always make easy to reunite bags. To make reuniting easier, for the rare occasions it happens, I suggest doing the following:
- Place a standard laminated business card or easy to read ID tag on the handle. This tag has my full name, multiple phone numbers I can be reached at and an e-mail address.
- Place a business card in the bag's ID card-slot (if that bag has one)
- Place a white or light coloured piece of duct tape inside the bag with you name, phone numbers and e-mail. Some of my bags have this tape identification twice just to be safe. Generally I place this info on the top lid of the bag or on the interior bag wall of the bag.
- Place a piece of white or pink tape in the outside of the bag with my name and phone number.
- Place bright tape on all the handles, zippers, or surfaces as a further way to make ID'ing the bag easier for those in the baggage office when I describe the bag to them.
By having my bag clearly labeled and marked should my bag get misrouted, my luggage tag get ripped off, my airline baggage tag get torn off and the tape with my info go missing.........the airline can still identify who the bag belongs to and call me directly by looking inside.
Also remember to go to the baggage office, at the airport, as soon as you discover your bag is not on the flight! This is important. You cannot leave the airport and call it in, you need to do it at the airport.
Should your bags have been transfered from one airline to another , contact the baggage office of the airline of your last flight of the journey. Once you have your baggage report in your hand call from the last airline you flew, immediately call the airline of your originating flight, this is the airline who's name is on the baggage tag (if you flew a code share flight, such as having booked a flight through Qantas (QF), but your first flight was actually operated by American Airlines (AA), then call AA, they are the airline that tagged the bag). Chasing your bags from both ends can at times help speed the process along, though!
If your delayed baggage caused you any problems at all do not be shy about seeking compensation from the airline. Most offer a $25 or $50 voucher, it's not much, but it is something. If your travel necessities, such as underwear, tooth brush, diapers, were delayed, also seek reimbursement or these items if you had to replace them. Not all airlines are willing to do this, as detailed in their contract of carriage, but some airlines will, such as United Airlines.
In case you are wondering who the best and worst "main line" airlines are for lost & delayed baggage are, the following are the most recent statistics list the following:
Hawaiian Airlines (HA) 2.6 delayed/lost bags per 1,000,
British Airways (BA) 28.0 delayed/lost bags per 1,000
Below are five photos of my new LL Bean carry-on sized suitcase, which I just purchased to be my checked bag replacing my old, beaten, totally worn out ad "over loved" American Tourister bag. This new bag is the LL Bean Carryall Rolling Pullman (14"w X 22"h X 9"d). I chose an LL Bean bag for one primary reason, they have a life time guarantee. If you break it, rip it, tear off the zipper, the airline shreds the wheels off, you name it and you don't think it lived up to your expectations for ANY REASON LL Bean will replace it , no questions asked, no ifs, ands or buts. I have returned items at 3:30am on Christmas Morning at the LL Bean Flagship Store in Freeport, Maine, (which never closes, the doors have no locks!) and been greeted with a smile and been asked if I wanted to swap the item, have a gift card for the store or a full cash refund. Hands down, the best customer service anywhere!
The five images of this bag show how I clearly identify my checked bags. This is done for two reasons. The first reason is so I can easily spot the bag, amid the hundreds of other black ballistic nylon bags, as it comes around the carousel and as a deterrent to airport thieves (they don't want bright clearly identifiable bags). Te second reason is to have my bag labeled in a way I can tell an airline how to quickly identify my bag should I become separated from bag due to a baggage problem. I make the bag as hard to miss as possible and I also make sure my name and contact information is on it multiple times.
Happy Flying!
-Fish
--Click On The Image To Enlarge It--


11/01/08 - Don't Let The Airlines Lose Your Bags .........Or If They Do, Get Reunited Quicker!
Over the past few days there seems to have been a spate of photographers who have become separated from their luggage while traveling. Maybe the Moon and the Stars have been perfectly aligned to cause this rash of photographer baggage problems. Maybe it's just that while only an average of .005 bags are delayed, misrouted/lost while in transit, with millions of bags in transit per day, that's still 5000 bags per million bags per day!
While you cannot prevent an airline from delaying or misrouting your bags, you can make it easier for the airlines to reunite you with your baggage. How? Simple........label your bag in multiple places and make your bag easily identifiable. Telling the agent that you have lost your 21" black ballistic nylon bag is not going to get your bag found in a sea of black ballistic nylon bags.
When you get your bag ready to go on the road you need to be redundant in your labeling. If you can get a monogram on the bag, get a monogram on your bag as well (Mine is monogramed with "Fish"). I also strongly suggest marking your bag in a bright unique way.
My bags are generally easy to spot, as mentioned in the entry Mark Your Camera Equipment & Never Leave Anything Behind, which I posted a few days ago. However, easy to spot bags do not always make easy to reunite bags. To make reuniting easier, for the rare occasions it happens, I suggest doing the following:
- Place a standard laminated business card or easy to read ID tag on the handle. This tag has my full name, multiple phone numbers I can be reached at and an e-mail address.
- Place a business card in the bag's ID card-slot (if that bag has one)
- Place a white or light coloured piece of duct tape inside the bag with you name, phone numbers and e-mail. Some of my bags have this tape identification twice just to be safe. Generally I place this info on the top lid of the bag or on the interior bag wall of the bag.
- Place a piece of white or pink tape in the outside of the bag with my name and phone number.
- Place bright tape on all the handles, zippers, or surfaces as a further way to make ID'ing the bag easier for those in the baggage office when I describe the bag to them.
By having my bag clearly labeled and marked should my bag get misrouted, my luggage tag get ripped off, my airline baggage tag get torn off and the tape with my info go missing.........the airline can still identify who the bag belongs to and call me directly by looking inside.
Also remember to go to the baggage office, at the airport, as soon as you discover your bag is not on the flight! This is important. You cannot leave the airport and call it in, you need to do it at the airport.
Should your bags have been transfered from one airline to another , contact the baggage office of the airline of your last flight of the journey. Once you have your baggage report in your hand call from the last airline you flew, immediately call the airline of your originating flight, this is the airline who's name is on the baggage tag (if you flew a code share flight, such as having booked a flight through Qantas (QF), but your first flight was actually operated by American Airlines (AA), then call AA, they are the airline that tagged the bag). Chasing your bags from both ends can at times help speed the process along, though!
If your delayed baggage caused you any problems at all do not be shy about seeking compensation from the airline. Most offer a $25 or $50 voucher, it's not much, but it is something. If your travel necessities, such as underwear, tooth brush, diapers, were delayed, also seek reimbursement or these items if you had to replace them. Not all airlines are willing to do this, as detailed in their contract of carriage, but some airlines will, such as United Airlines.
In case you are wondering who the best and worst "main line" airlines are for lost & delayed baggage are, the following are the most recent statistics list the following:
Hawaiian Airlines (HA) 2.6 delayed/lost bags per 1,000,
British Airways (BA) 28.0 delayed/lost bags per 1,000
Below are five photos of my new LL Bean carry-on sized suitcase, which I just purchased to be my checked bag replacing my old, beaten, totally worn out ad "over loved" American Tourister bag. This new bag is the LL Bean Carryall Rolling Pullman (14"w X 22"h X 9"d). I chose an LL Bean bag for one primary reason, they have a life time guarantee. If you break it, rip it, tear off the zipper, the airline shreds the wheels off, you name it and you don't think it lived up to your expectations for ANY REASON LL Bean will replace it , no questions asked, no ifs, ands or buts. I have returned items at 3:30am on Christmas Morning at the LL Bean Flagship Store in Freeport, Maine, (which never closes, the doors have no locks!) and been greeted with a smile and been asked if I wanted to swap the item, have a gift card for the store or a full cash refund. Hands down, the best customer service anywhere!
The five images of this bag show how I clearly identify my checked bags. This is done for two reasons. The first reason is so I can easily spot the bag, amid the hundreds of other black ballistic nylon bags, as it comes around the carousel and as a deterrent to airport thieves (they don't want bright clearly identifiable bags). Te second reason is to have my bag labeled in a way I can tell an airline how to quickly identify my bag should I become separated from bag due to a baggage problem. I make the bag as hard to miss as possible and I also make sure my name and contact information is on it multiple times.
Happy Flying!
-Fish
--Click On The Image To Enlarge It--


10 January 2008
Buy Girl Scout Cookies For The Troops Overseas
10/01/08 - Buy Girl Scout Cookies For The Troops Overseas
Do you love Girl Scout Cookies? Want to bring a smile to Troops serving in the Military overseas? Consider purchasing Girl Scout Cookies to be donated to those serving in the Military!
My daughter Lauren just came home with her first packet of Girl Scout Cookies (she's a Brownie Scout) and would love to have people purchase these cookies to be donated to the Troops who are away from home.
Sometimes it's the small simple pleasures of home that make those serving far away from home happy...........and one box of cookies can bring a smile to a Serviceman or Servicewoman serving tour of duty half-way around the world.
If you'd like to help Lauren in her goal of selling 100 boxes of cookies to be donated to The Troops , drop me an e-mail at fish@flyingwithfish.com or e-mail Lauren directly at lauren@fishfoto.com
Cookies are US $4.00 per box by check. For PayPal users, the cost is US$4.42 per box.
All checks (which are preferred) would be made out directly to the Girl Scouts of Connecticut and all PayPal payments will go directly to the Girl Scouts of Connecticut as well.
Thanks.........and Happy Flying!
-Fish
09 January 2008
A Fun Way To Search For Airfare Specials
Web: www.fishfotoworldwide.com -- E-Mail: fish@fishfoto.com
09/01/08 - A Fun Way To Search For Airfare Specials
We all know that searching for flights and airfares can be difficult and an irritating task. You search the same flight on four different online sources and end up with four different fares.
I can't tell you how to make searching for your flight less irritating, but I can tell you how to make it more fun! Over the past few months I have been playing with a fun online booking took from United Airlines that combines United's online fare system with Google Earth.
When you pull up a specific city you can see all the routes for sale from that departure airport laid out over a Google Earth Map. You can click on the fares, zoom in to see the sights or just stroll The Globe while viewing United's fares.
I know, not everyone uses United Airlines. Not everyone flies with the Star Alliance carriers, but this is still a fun little application to make the task of search for flights a little more enjoyable. I can tell you first hand that it is hard to make booking a flight from Hartford (BDL) to Vancouver (YVR) interesting, but this tool at least lets me have some fun while exploring my options.
You can download the Google Earth application and install the United Airlines components by visiting www.unitedgoogleearth.com
There are a few other airlines that are using Google Earth As well, such as
Austrian Airlines
KLM Royal Dutch Airlines
Swiss Air Lines
Iceland Air
Happy Flying!
--Click The Image Below To Enlarge It--

08 January 2008
Britain Changes Carry-On Rules For Carry On Bags.......sort of, kind of, well some of the airports
Web: www.fishfotoworldwide.com -- E-Mail: fish@fishfoto.com
08/01/08 - Britain Changes Carry-On Rules For Carry On Bags.......sort of, kind of, well some of the airports
For more than a year passengers flying from airports in the United Kingdom, or transiting between flights via an airport in the United Kingdom, have been forced to deal with a strict restriction of flying with only one carry-on bag. This has been particularly challenging for photographers. We often fly with a loaded camera bag and a smaller laptop bag, or personal bag and hate to part with our equipment.
As of yesterday, Monday, January 7th 2008, the British Government removed this restriction for the flying public, however the reinstatement of flying with one "carry on" and one "personal item," does not apply to all UK airports. In fact to make it more confusing at some airports the rules are not the same from Terminal to Terminal!
Confused yet? I know I am. For passengers flying from London's Gatwick (LGW), you need to now which terminal your flight is departing from, if on a connecting flight, to know the cabin baggage rules.
Passengers flying from LGW's South Terminal can now fly with one "carry-on" bag and one "personal item," ONLY ON CONNECTING FLIGHTS. Passengers flying from LGW's North Terminal will continue to be limited to only one carry-on bag on all departing flights. Passengers originating from LGW may only travel with one carry-on at this time.
At this time you may fly with a "carry-on bag" and a "personal item" fro the following airports:
London Heathrow (LHR)
London City (LCY)
London Stansted (STN)
Birmingham (BHX)
Cardiff (CWL)
Manchester (MAN)
Glasgow (GLA)
Aberdeen (ABZ)
Edinburgh (EDI)
Inverness (INV)
Newcastle (NCL)
As of today the following airports are still restricted to one carry-on bag only:
London Gatwick (LGW)
London Luton (LTN)
Leeds/Bradford (LBA)
Liverpool (LPL)
Belfast (BFS)
Jersey (JER)
Newquay (NQY)
Durham Tees Valley (MME)
East Midlands (EMA)
Norwich (NWI)
To make this even more confusing, airlines are able to overrule the eased carry-on baggage restrictions and maintain the single carry-on bag restrictions.
If your airport is not listed above, please check with the Department for Transport's web site at: http://www.dft.gov.uk/transportforyou/airtravel/airportsecurity/cabinbaggage
The following UK airlines will allow two carry on cabin bags, from airports that allow two carry on cabin bags
British Airways
BMI / British Midlands
Eastern Airways
FlyBe
Air Southwest
The following UK airlines will continue to only allow one carry on cabin bag
Virgin Atlantic
Easy Jet
Ryan Air
Monarch Airlines
EuroManx
Check with your individual airline for additional information
Hopefully the British Government can get this sorted out quickly so there is a universal set of rules throughout the United Kingdom.
Happy Flying!
Mark Your Camera Equipment & Never Leave Anything Behind
Web: www.fishfotoworldwide.com -- E-Mail: fish@fishfoto.com
08/01/08 - Mark Your Camera Equipment & Never Leave Anything Behind
One of the most commonly asked question is "why is your equipment covered in pink tape?" (about a year ago I was asked "why is your gear gear covered in purple & orange tape," I changed tape colours this year to simplify things).
The answer to "Why is your equipment covered in pink tape?" is easy.
I started the practice of placing bright colourful tape on my equipment when I covered hard news, politics and a lot of sports. Every photographer's equipment looked essentially the same when placed down. By putting very bright tape on my cameras, lenses, monopods, etc, I could easily identify which gear was mine in the media room or on the sidelines. Many photographers use blue, red, yellow and green, so I avoided these colours and went for incredibly bright coloured tape.
As my work shifted away from news, sports and politics I continued to tape my equipment out of habit. I found having my bags taped made picking them out at the baggage carousel easy following a flight. Bright tape on a bag also made it easy to find my bag on a dark overnight flight when looking in the overhead storage bins.
With the progression of my work towards environmental portraits and corporate work I found the tape had another extremely valuable use. This new use? Never leaving my gear behind!
Over the past few years I have taped every piece of equipment (except my Canon 70-200f2.8L for some unexplainable reason, it's just wrapped in black gaffers tape). From PC cords to lens caps, camera batteries to camera bodies, everything has tape on it. When I tear down after a shoot I can quickly scan the room and look for the hot pink tape. When I pack up and leave a hotel room, I always scan for bright pink tape. When I am unpacking my bags it is hard to not notice the bright tape inside the solid coloured fabric of a camera bag.
In addition to the pink tape, all of my photo gear (within reason) also has a white label on it. This white label is printed with my name and contact information. Should I leave something behind, and it is not likely, it increases my chances of someone looking at the label of giving me a call to tell me that have my gear.
A funny side affect to this equipment labeling once caused question of my gear on a flight from Minneapolis (MSP) to Philadelphia (PHL). I had received a lens back from repair just before departing for a job. My tape and label were removed from the lens during the repair, and I didn't relabel them before leaving, so when going through a routine TSA secondary screening at MSP they wanted to know if the lens was mine and why it didn't match the other equipment! (they didn't question the 70-200f2.8L with no tape, they were questioning my Canon 85f1.8 USM)
Looking for a great place for a wide selection of funky coloured quality tape? Check out Tape Brothers at www.tapebrothers.com They have a great selection of Fluorescent Gaffers Tape
So for those of you who have e-mailed me to ask "Why is your equipment covered in pink tape?" hopefully this answered your question.
Happy Flying!
--Click On The Image To Enlarge It--

07 January 2008
Protecting Your Equipment From Theft While Traveling Using The Art Of Disguise!
Web: www.fishfotoworldwide.com -- E-Mail: fish@fishfoto.com
07/01/08 - Protecting Your Equipment While Traveling Using The Art Of Disguise!
There is a sad fact about flying with your camera equipment as checked baggage. No it's not that it may get crushed by a Ramp Tug (as one of my Lowe Pro Pro Roller II bags was) , it's not that the ramp agents may toss a bag marked "fragile" over a 10 foot gap, it is that airport thieves are educated thieves.
When checking your equipment there are certain airports around the world that are known for heavy thievery. There are also some airports with a lower rate of baggage theft, but still worth preparing for. I am not talking about thefts that happen "behind the scenes," those thefts generally happen as a result of someone spotting something in your bag during the X-Ray screening (not really a problem in the US as that screening is handled by the Transportation Safety Administration/TSA) , I am talking about thefts from the baggage carousel as your baggage is delivered to you.
Thieves who work in airports know what they are looking for. These people make a living at swooping in, quickly eye-balling the baggage , taking one or two non-descript bags and walking off with them.
There are a few ways to try and combat this problem, I employ a few of them to try and protect my equipment.
1) Do not use shipping cases that look like like photographic equipment cases. My standard strobe kit, for my Lumedyne heads, packs, etc, is the Lowe Pro Pro Roller II case. My case has the Lowe Pro logo, which is dead give away to the contents of the bag, so I got it "worn off," so it is not clearly visible, if recognizable at all. I make sure the bag never has fragile sticker on it, even after the bag has been open and hand inspected. In addition to using a very beat up and non-descript case I wrap the edges in bright obnoxious colours (photo below shows purple/orange tape, I have now changed all to my bags and gear bright hot pink). This colour marking allows me easily see my bag as it comes down amid all the other black ballistic nylon bags. Should someone snag my bag I can very easily spot my bag, but thieves are not looking for bags that may draw someones attention, only those that can not be identified immediately upon sight.
2) Mark your case in such a way that no one would want to snag it off the carousel. If you bag is marked up in such a bright, obvious, unique way (such as my Pelican 1514 being covered in stickers) that it would be very difficult for a thief to walk up and grab the case. Don't be fooled, your Pelican case does not blend in with the black bags. An airport thief knows there is only one real use for a Pelican, it is to protect expensive equipment be it still cameras, video or audio gear, even guns.
3) When traveling to a high risk for theft airport such as Cancun (CUN) always refuse "priority" tags if they are offered to you, and if you must check your gear case , place the case inside another bag. For travel to high risk airports I place my Pelican 1514 (if I must check it) inside a bright green Mountainsmith Cube bag. The Mountainsmith Cube (as seen below) stands out, it would deter most thieves and it also looks like some tourists bag loaded with clothing. There are no signs indicating the potential contents of the bag.
Some tips for really making sure you are not separated from the bag are
- get to the baggage claim as soon as possible
- position yourself as close to the entrance of the baggage carousel as possible
- as you claim your bags stack them in front of you against the baggage carousel as you await your others bags
Checking gear is inevitable at times. You should protect yourself as much as possible so you and your gear are not separated.
Below is a photo of my Pelican 1514 inside the Mountainsmith Cube , the Mountainsmith Cube zipped up around my Pelican 1514 and my LowePro Pro Roller II
Happy Flying!
--Click On The Image To Enlarge It--


06 January 2008
No Jet Lag Intensive Photo Workshop - Feb 5 to Feb 8 - Two Seats Just Opened Up!
Web: www.comeflywithfish.com -- E-Mail: fish@fishfoto.com
01/06/08 - No Jet Lag Intensive Photo Workshop - Feb 5 to Feb 8 - Two Seats Just Opened Up!
At this time two seats have unexpectedly opened up for the No Jet Lag Intensive Photo Workshop! This workshop has one goal. To make you a better photographer on the road. Don't miss the last opportunity to jump on board and come photograph The Chinese New Year in China!
You'll learn how to pack, how to travel light , learn to base your equipment choices what you need rather than what you want and how to maximize your limited time on the ground. Learning to travel light, effectively and with minimum time on the ground saves your time and money. The skills you will learn during the No Jet Lag Intensive Photo Workshop can make you and your skills more attractive to potential clients.
What's that? You're a wedding photographer and think this does not apply to you? Think again, destination weddings are not "vacations," they are work. Knowing how to apply these skills to working with wedding clients can increase your ability to cut costs to increase your profits.
The classroom experience begins in-flight and once we land you'll hit the ground running. Your experience will include handling diverse real-time assignments , ranging from travel features to an engagement session, on real-time deadlines throughout the 1.5 days you'll be in Hong Kong. You'll be pushed to the limits of handling jet lag and working in environment that is foreign to you. You will learn to work on the road in a whole new way.
To learn the complete details of the No Jet Lag Intensive Photo Workshop please visit www.comeflywithfish.com
This workshop starts at US$2,200 for a seat in economy and $3,200 for a seat in business. Students are entitled to a US$200.00 educational discount for this workshop experience.
Interested? Drop me an e-mail at fish@flyingwithfish.com
Happy Flying
Check Your Flight Status & Know Your Options
Web: www.fishfotoworldwide.com -- E-Mail: fish@fishfoto.com
06/01/08 - Check Your Flight Status & Know Your Options
When we travel our personal schedule revolves around our airline schedule. While this may not be the case in our day to day schedule while on the road, it is certainly true on the days we are flying.
The best web site I have found for checking my flights is Flight Stats (www.flightstats.com). Hands down, this is the best site for up to the moment accuracy on flight departures and arrivals. I check Flight Stats religiously when flying, not only to check my departure flight but my connecting flights as well. There is nothing worse than being in transit knowing that you will miss your connection! If I know that I will miss my connection before my flight departs I can start making phone calls to correct this problem and give myself the best options for not disrupting my travel schedule.
You can search your flights easily. Searches can be performed by Airline/Flight Info, Route and by Airport! This easy to use interface makes the process of checking your flights.
When searching flights you can search by "primary flight" info or by "code share" info. An example of this is Air France (AF) Flight 023, departing JFK at 4:55pm heading to Paris (CDG), also flies as a Delta Airlines (DL) flight 8601. This is great if you are searching by route, because most people ticket for DL Flt 8601 have no idea the flight is really AF 023 , all they know is that their flight says "Check In With Air France At JFK Terminal 1."
As an added feature to make using Flight Stats are tools that you can set to have your self e-mailed or called with updated flight information prior to your departure. This feature has worked for me in the past when the status of a flight has changed during my hour drive out to the airport.
Knowing your options can allow you to travel more relaxed and be in control of your schedule.
Happy Flying!
04 January 2008
Duct Tape, A Photographers Best Friend & Travel Companion.......Now In A Perfect Mini Travel Size!
www.fishfotoworldwide.com -- E-Mail: fish@flyingwithfish.com
04/01/08 - Duct Tape, A Photographers Best Friend & Travel Companion.......Now In A Perfect Mini Travel Size!
Is there anything thing more important than duct tape for fixing anything on the road? Yes, it's true many photographers favour gaffers tape, I know I always carry a small-roll with me, but for many quick fixes and working in foul weather, nothing can be better than duct tape.
On a recent trip up to L.L. Bean (www.llbean.com) in Freeport, Maine (always open, 24/7/365, they have NO locks on their doors, they can't close!) I found the perfect solution for my need to pack a roll of duct tape, while traveling in the smallest lightest configuration possible. For a long time I ended up leaving my small-roll of duct tape behind, because even the small-rolls of duct tape take up more space than I want to spare in my bag. While the rolls are small, the cardboard roll that the tape is wound on is very wide.................. The solution to this? The Mini Roll Duct Tape by GearAid (www.adventuremedicalkits.com), turns out you can buy these two packs of 2" x 100" rolls of duct tape almost anywhere, they are currently only $3.00 at REI (www.rei.com)!
What makes these mini rolls so easy to travel with? Simple, you can place a full Gear Aid Mini Roll Duct Tape inside the cardboard insert of a Scotch small roll of duct tape! Peal off some of the Mini Roll Duct Tape fixing and affixing things and you can slide the whole roll into the cardboard insert of a Bogen's mini-roll of gaffers tape!
This is the answer to my tape prayers. It really is, I missed having a roll of plain, ugly, unfashionable silver duct tape in my bag.
This truly is a must have for every photographer, whether they are flying around the world or just heading down the road.
Below is the Gear Aid two pack of Mini Roll Duct Tape and a photo of a Bogen's mini-roll of gaffers tape next to the Gear Air two pack of Mini Roll Duct Tape.
Happy Flying!
--Click On The Image To Enlarge It--


Subscribe to:
Comments (Atom)


