Showing posts sorted by relevance for query mountainsmith tour part. Sort by date Show all posts

16 January 2008

The Mountainsmith Tour - Part 2 - The General Purpose Pack

Web: www.fishfotoworldwide.com -- E-Mail: fish@fishfoto.com

16/01/08 - The Mountainsmith Tour - Part 2 - The General Purpose Pack

Like most photographers I have used many bags for many purposes, but I always return to the Mountainsmith Tour as my "general purpose" pack. My love affair with the Mountainsmith Tour started many years ago while covering the National Football League (NFL) with the now ancient Nikon/Kodak NC2000c and Nikon D1 (just for reference I switched to Canon in 2002).

The slim profile of the Mountainsmith Tour coupled with it's sizable storage capacity, it's incredibly durable construction and mostly weather proof design made the pack ideal for covering sports in the New England winter. The more I used the pack for sports, the more I adapted it to a general purpose pack and it has no evolved into my "go to" bag.

As a general purpose bag I tend to use a variety of set-ups, which always revolves around what equipment is needed. Rather than write up a dozen potential set-ups of the Mountainsmith Tour I'll address my use of the bag, for general shooting on a broad level.

My equipment needs for news, corporate work, weddings and even a long weekend away with my family is generally very similar. I try and work as simply as possible, carrying as little as possible, maximizing the potential options with a minimum amount of weight.

A typical set up walking out the door is two cameras on my shoulders, three lenses in the Mountainsmith Tour, basic accessories and a Newswear Large Press Pouch. While I like using a Domke 3-slot insert with the Mountainsmith Tour I often go without the insert. I make sure I use lens caps to protect my glass. I am not overly worried about lenses rubbing against each other or having superficial cosmetic scuffs on the barrels of the lenses.

To add to the Mountainsmith Tour's versatility and comfort I attach a Newswear Large Press Pouch. The Newswear Pouch is secured with a small carabiner, that also holds a strap for a small roll of gaffers tape.

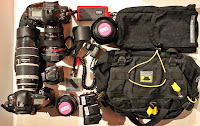
A typical set up for the Mountainsmith Tour for news or general assignments is the following:
- Canon 580ex Speedlight
- Canon 28-70f2.8L (reversed lens hood)
- Canon 50f1.4 (lens hood affixed)
- Canon ETTL Cord
- 3 spare EOS 1D batteries
- 2 packs of four "AA" batteries
- Maglight Mini-Mag flashlight
- Think Tank Pixel Pocket Rocket (CF Card Wallet with 10 CF Cards)
............on my shoulders walking out the door will be to EOS 1D series bodies with 16-35f2.8L and 70-200f2.8L

A typical set up for the Mountainsmith Tour for weddings or corporate assignments is the following
- Canon 580ex
- Canon 14f2.8
- Canon 50f1.4 (lens hood affixed)
- Canon 70-200f2.8 (in Newswear Pouch with Nikon HN-28 screw in lens hood)
- Holga Modified lens
- Canon ETTL Cord
- 3 spare EOS 1D batteries
- 2 packs of four "AA" batteries
- Maglight Mini-Mag flashlight
- Think Tank Pixel Pocket Rocket
.....................on my shoulders is usually two Canon EOS 1D bodies with 24f1.4L and 85f1.2L.


What I carry varies depending on my needs or wants at any moment for any job. I can end up with a 16-35f2.8, 24f1.4L and 24f3.5 TS-E (tilt shift) in the bag depending on the job........and yes it is unusual to walk out the door with three 24mm focal length lenses at the same time, but it has happened for specific shoots.

Below are photos of these two common set ups for a "General Purpose" set up of my Mountainsmith Tour bag. The photos show the Mountainsmith Tour bag laid out next to all the gear, as well as the bag with all the gear packed in it.

Happy Flying!

--Click The Images To Enlarge Them--

15 January 2008

The Mountainsmith Tour - Part 1 - The Perfect Travel Companion

Web: www.fishfotoworldwide.com -- E-Mail: fish@fishfoto.com

15/01/08 - The Mountainsmith Tour - Part 1 - The Perfect Travel Companion

One of the most common problems all photographers face is the "search for the perfect bag." We all clamor for that one bag that will solve all our problems, I have more than a dozen "perfect bags." Over the years I have come back to one bag over and over and over again, the Mountainsmith Tour.

This week Flying With Fish is dedicated to the Moutainsmith Tour and the multiple ways I have used, adapted and pack this bag, from a news/sports/wedding bag, to a lighting kit bag to a "wow it can haul that also! "bag. I have owned three of these bags, currently owning two of them, and have also started to use the Mountainsmith Tour's slightly larger sibling the Mountainsmith Day bag. In fact, if possible, I plan to try and travel approximately 18,000 miles over three days, shooting in two countries, on two continents, with just the Mountainsmith Tour and Mountainsmith Day next month!

Before we kick this week off of the Mountainsmith Tour off, let me go over the basics of the bag and why I love it.

1) The Mountainsmith Tour is a near perfectly designed lumbar bag. It sits comfortably on my body no matter what he weight load
2) The waist strap has two independent adjustment straps to allow me to change the angle of the bag for more comfort as I work
3) The pack has a bright yellow interior making it almost impossible to lose anything inside the bag
4) The main pocket has a small zipper pouch to store smaller items in their own area
5) The exterior pocket has a small "clip-strap" to attach small items, such as a CF card wallet, securely in your bag
6) The pack has an optional shoulder strap which is great at times when you want extra support
7) The pack's waist straps can be tucked in an hidden for use as a shoulder bag
8) The rear padding has a small pocket built in to quickly stash items, such as a CF card wallet while shooting or an airline ticket while going through security
9) The nylon construction of the bag is nearly indestructible (I had one die, my dog ate it after I left a candy bar on it, I can't fault the bag for my dog's munchies)
10) The Mountainsmith Tour (and Mountainsmith Day) are available in Recycled Materials! That's right the bags are made up from approximately 13-to-16 plastic bottles! Mountainsmith estimates that the Recycled Tour & Day pack saved about 1.1million bottles from going into the landfills in 2007!

Below are three photos of my two Tour packs. I use a Pink one (my daughter Lauren chose it for me) and a black one (for those slightly more formal occasions). The photos show an overall view of the packs, the yellow interior and the proud recycled logo!

Happy Flying!

--Click The Images To Enlarge Them--


17 January 2008

The Mountainsmith Tour - Part 3 - The Compact Road Warrior Lighting Kit

Web: www.fishfotoworldwide.com -- E-Mail: fish@fishfoto.com

17/01/08 - The Mountainsmith Tour - Part 3 - The Compact Road Warrior Lighting Kit

While working on the road there are many situations that require me to light quickly and on the run............and my Mountainsmith Tour provides me a packing option that is perfect for working quickly and effectively.

As much as I'd often like the opportunity to set up a full lighting kit for many of my subjects, or at least be able to set up a carefully planned small lighting set up, this is not always possible. Many of my shoots need to be shot quickly, with little-to-no planning in regard to location and this leaves me with the old reliable "single light stand-by" option.

The "single light" set up is an extremely common set up among news and editorial photographers. It is not always the most ideal set up, but it is done for a variety of reasons, the most common being that it can be done quickly. You're waiting for a very high profile person, once they arrive you are told you have 5 minutes (which really means 2 minutes) and you are told where to set up and given 5 minutes to do so. These can be frustrating situations, but I have learned to plan for these situations. The constraints placed on me are not my client's problem, they just need the photographs, and it is my job to provide these images regardless of obstacles.

With the need to create a very small, very unassuming, ultra portable lighting kit, I have adapted my Mountainsmith Tour bag to meet my most basic lighting needs. This kit makes my "stripped down" kit look complex, but it gets the job done. This configuration of the Mountainsmith Tour can be carried on the plane, worn around your waist with two cameras on your shoulders and easily be set up and torn down in less than five minutes anywhere...........it is my "Road Warrior Single Light Kit".

The following equipment makes up my "Road Warrior Single Light Kit":
- Nikon SB-28dx
- Calumet Swivel Adapter
- PhotoFlex Speedring
- Pocket Wizard Transmitter
- Pocket Wizard Receiver
- PC Cord
- 2 "AA" four packs
- Roll of Gaffers Tape
- 22" Photoflex LiteDisc
- Maglight MiniMag Flashlight
- Bogen 3373 Compact Light Stand
- (often added and not pictured : Photoflex Q39 Small Softbox)

All of this gear fits neatly inside the Mountainsmith Tour (including the Photoflex Q39 Softbox that is not pictured). The Bogen 3373 Compact Light Stand is attached to the Mountainsmith Tour by the bags strap system under the bag.

If you are interested in learning more about single light set ups, you need to check out Neil Turner's web site www.dg28.com

For those interested in learning a wide variety of small light shooting concepts and techniques, I strongly suggest visiting The Strobist at www.strobist.com . The Strobist is the most comprehensive source anywhere for using small strobes and learning to maximize the potential of your small strobe capabilities.

Below are some photos of my Mountainsmith Tour and the gear that makes up my "Road Warrior Single Light Kit." Even with all the gear pictured below (and the often added, but not pictured Photoflex Q39 Softbox) the pack has enough room for other items you may want to add. I have packed all this, plus tossed in an additional small lens (like the 50f1.4 , 85f1.8, 12mm macro extension tubes) and lashed on a Gitzo 0012 tripod with no problems in regard to space, weight and maneuverability.

Happy Flying!

--Click The Images To Enlarge Them--


21 January 2008

The Mountainsmith Tour - Part 5 - Traveling The Globe In Two Small Bags

Web: www.fishfotoworldwide.com -- E-Mail: fish@fishfoto.com

21/01/08 - The Mountainsmith Tour - Part 5 - Traveling The Globe In Two Small Bags

What do you get when you pair the Mountainsmith Tour with the Mountainsmith Day? One of the lightest, most flexible bag combinations for traveling light!

Most photographers over pack for travel. A simple overnight trip can often result in a large rolling camera case, a backpack and a full-sized checked bag. There are times you need to pack like this, but you can also scale down what you need, pack entirely based on "needs" not "wants" and do a lot with a very small packing kit.

In a few weeks I will be leading a workshop taking a small group of photographers over to Hong Kong to photograph the Chinese New Year. For me, this will require approximately 18,000 miles of flying over a three day span. I will shoot extensively in Hong Kong on February 7th and 8th, including an engagement session, then photograph an engagement session in Vancouver, British Columbia, on the 8th of February. Sounds like a packing and logistics nightmare? Not at all.

I have chosen my packing to be complete, compact and light and can carry everything I need in the Mountainsmith Tour and the Mountainsmith Day packs. Both bags can hold a remarkable amount of things in a very small space.

The following is everything that will be packed into the Mountainsmith Tour and Mountainsmith Day packs for the No Jet Lag Intensive Photo Workshop

--Camera Gear--
2 - EOS 1D series bodies (carried on my shoulders, each with a lens)
3 - Spare 1D batteries
1 - 14f2.8
1 - 24f1.4
1 - 50f1.4
1 - 85f1.2 (may be swapped for the 85f1.8)
1 - 70-200f2.8
1 - Modified HolgaLens
1 - 580ex
4 - Spare CF Cards
1 - ETTL Off Camera Cord
1 - Photoflex compact 22" reflector gold/white
8 - Spare "AA" batteries
1 - Mini-roll of Gaffers Tape

--Electronics--
1 - Apple MacBook 13"
1 - APC emPower inverter
1 - Canon 1D battery charger
1 - Apple MagSafe Power Supply
1 - Lexar CF Card Reader
1 - USB Phone Charger
1 - USB 2.0 cord
1 - iPod Video
1 - Set of Sennheiser Noise Canceling Headsets
1 - Sleeve of 10 DVDs
1 - 1gb JumpDrive
1 - Compact/Credit Card International PowerTip converter
1 - 3-slot power adapter
2 - Spare "AAA" batteries


--Misc--
2 - Shirts
2 - Pairs of boxer shorts
2 - Pairs of socks
1 - Toothbrush
1 - Mini-container of Gold Bond Powder
2 - Mini-packs of baby wipes
1 - Right Guard deodorant stick
2 - TSA Approved combination locks

Anything else I will need will be worn or carried, such as pants, belt, wallet, passport, etc etc.

The three photos below show everything laid out next to the Mounatinsmith Tour and Mountainsmith Day packs, as well as the two packs full packed up.

If you are interested in the No Jet Lag Intensive Photo Workshop, Feb 5 to Feb 8, there are a few seats still available. You can learn more about this workshop at www.comeflywithfish.com . I will be holding two single day No Jet Lag Workshops on March 15 and March 16 in the Baltimore/DC area and New York City for those interested in learning the "nuts-n-bolts" of traveling as a photographer. For more info drop me an e-mail at fish@flyingwithfish.com

Happy Flying!

-Fish

--Click The Images To Enlarge Them--


23 July 2008

What Mountainsmith bags does Flying With Fish personally travel with? Lets find out!

Web: www.fishfotoworldwide.com -- E-Mail: fish@flyingwithfish.com

22/07/2008 - What Mountainsmith bags does Flying With Fish personally travel with? Lets find out!


With the recent Mountainsmith Bag giveaway contest, during the 'The Great Mountainsmith Bag Give Away From Flying With Fish' I received a few e-mails asking me if I chose to use Mounatainsmith bags because of of the company's giveaway on Flying With Fish.

I dismissed the first email or two, but when the next three rolled in I decided I should probably address this question. In fact I have been using Mountainsmith bags for my camera equipment for many years...........nearly a decade now! Throughout this past year I have detailed my use of Mountainsmith bags in great detail, including a five part series on the Mountainsmith Tour back in January.

As a photographer who travels, I have used Mountainsmith bags around the world and chose to accept Mountainsmith's offer of giving away a few of their bags because I am a huge fan of their products!

How big of a fan am I of the Mountainsmith line of bags? To demonstrate my enjoyment of their bags I loaded up some of my collection into the back of my 1990 Volvo 245 and shot a picture of my collection (missing from the photo is my bright pink Mountainsmith Tour).

The Mountainsmith bags in the photo below from left to right are:

- The Day : The Day is a fantastic 'hit the ground running bag' to carry multiple carry configurations for shooting, lighting, taking your laptop to the library (it's even good for hiking).

- The Parallax : I used The Parallax as the only bag I brought with me while shooting a project where I flew around the world 1.5x in 4 days! Great bag to carry everything, while still being carry-on legal and small enough to wear on my back while shooting!

- The Cube : The Cube is great for not only packing your clothes for travel, like a duffel bag, however I use mine to disguise checked camera equipment. When I am forced to check camera gear in cases such as the Pelican 1514, or long lens shipping trunks, I place these cases inside the The Cube. When The Cube comes around the baggage carousel no one gives it a second glance as it looking nothing like what you'd expect to find camera equipment in. The bright neon green colour is to allow me to quickly and easily spot my bag among the sea of black ballistic-nylon bags in the baggage area

- The Correspondent : The Correspondent is the newest bag in my collection, and after some heavy travel in the past few months it has proved to be fantastic rolling bag! The unique interior configurability, while taking getting used to, has been great, and for many trips this bags design has allowed me to travel with one bag only for gear, clothes, laptop, etc.

-The Tour (in front of The Cube): The Tour has been by far my most used Mountainsmith pack. The Tour is a lumbar pack designed for hiking, but for me it is the do it all bag. I have at least half-a-dozen configurations of this pack. The Tour coupled with a 'Newswear Pouch' can meet nearly any shooting situations needs. The bright yellow interior is also ideal for not loosing little black lens caps, black cords etc etc........I also have a bright pink Tour which my daughter bought me that is not shown in the photo

- The Amp (in front of the Tour) : The Amp is a small mobile phone holster which I use every day to carry my Motorola Razr around on my belt. I wish they made a sleeve large enough for my Blackberry! The Amp's oversized top-flap and excessive use of Velcro ensures my phone is always in its case even when constantly being banged by camera equipment, lens pouches or waist packs. It has been by far the best mobile phone holster I have ever used........and I have used mine for over a year now since I first spotted the Amp at the Kittery Trading Post up in Maine.

Well there you go, my regular line-up of Mountainsmith bags (and yes I have others that are old and worn out elsewhere, but I wasn't emptying my entire closet into the back of my car)..........and why the Volvo again (I used the bumper in this week's post on the Sony PSP), I just felt like photographing my car for no real reason :0)

Happy Flying!

--Click Image To Enlarge It--

19 January 2008

The Mountainsmith Tour - Part 4 - Shooting Portraits While Walking The Streets Bag

Web: www.fishfotoworldwide.com -- E-Mail: fish@fishfoto.com

19/01/08 - The Mountainsmith Tour - Part 4 - Shooting Portraits While Walking The Streets Bag


There are times shooting when my waist pack needs to carry some lenses, some lighting gear, a few batteries, and allow me to quickly work out of it. The obvious bag of choice for me (most of the time) is the Mountainsmith Tour.

My "shooting on the run" set up is a mix of gear that allows me to handle a wide variety of situations with a minimal amount of equipment. This kit often goes out for quick location portraits or engagement sessions being shot in totally uncontrolled environments. Generally these uncontrolled environments are out in the street, in a very busy and public building or needing to light a shoot, while walking with my subject. By carefully choosing my equipment and knowing how to maximize the available space in the Mountainsmith Tour I can carry a wide variety of equipment around my waist, while keeping a small "footprint" while shooting.

When working on the street, or in an uncontrolled environment, the less space you occupy, or smaller footprint you create, the more maneuverable you become. Maneuverability equates to flexibility in shooting, which allows for a much more fluid shooting style, especially when working alone.

The most common setup for this kit includes the following
- Two Canon 1D bodies (on my shoulders)
- Canon 14f2.8L
- Canon 24f1.4L
- Canon 50f1.4
- Canon 85f1.2L
- Canon 70-200f2.8L (In attached Newswear Press Pouch)
- Canon 580ex Speedlight
- Canon ETTL Off Camera Cord
- Two Spare 1D series batteries
- Four spare "AA" batteries
- Think Tank Pixel Pocket Rocket (CF Card Wallet)
- Photoflex 22" LiteDisc Reflector , Gold/White
- Small roll of Gaffers Tape

By working with smaller prime lenses I find I able able to be more flexible in my packing options. This flexibility in packing allows me to work "differently" such as carrying a small, easy to handle, reflector that I can fold up and stuff in my waist pack. The beauty of the Photoflex 22" LiteDisc is that it can opened quickly, held in my left hand to direct the light while holding my cameras up with my right hand and shooting at the same time. Yes an assistant would be easier, but I generally work alone, so my kit is designed to allow me multiple options while only being able to rely my skill of working alone.


Below is a photo of my general set of up this kit.

Happy Flying!

--Click The Images To Enlarge Them--

26 March 2008

The Mountainsmith Day - The Hit The Ground Running Micro-Location Day Bag

Web: www.fishfotoworldwide.com -- E-Mail: fish@fishfoto.com

26/03/2008 - The Mountainsmith Day - The Hit The Ground Running Micro-Location Day Bag

One of the biggest challenges I face in my travel logistics is trying to pack as much as I can into the smallest, lightest, most mobile kit available to me. Every job is different, every job has it's own unique needs and challenges. If I stay focused on what I "need," not what I "want," I can continuously make my kit smaller and more tailored to each type of shoot.

Two months ago I added the Mountainsmith Day Pack to compliment my often talked about Mountain Smith Tour packs. I have played with the Mountainsmith Day in various set ups, and as much as I enjoyed the bag I knew I was somehow missing the real niche' of this bag in my day-to-day shooting.

This past Saturday I decided to create a while new light versatile mobile kit based around the size and strengths of this bag. I wanted a shoulder bag that was light, but one that transfered the majority of the weight to my waist; one that could hold a significant amount of equipment and also give me more internal working room; one that could vertically transport a light stand and still not be a full sized bag. The answer to all these questions, wants and needs was obvious, the Mountainsmith Day Pack.

To separate my lenses from my reflector and flag/gobo I used the Domke F-803 lens insert, this gave me a more stable working space. The lens insert also keeps my lenses & flashes organized while going through airport security, sitting in the aircraft's overhead bins and obviously while out and about shooting in the streets of Philadelphia. With the Mountainsmith Day being considerably deeper than the Mountainsmith Tour I could fully insert my Canon 70-200f2.8L , with Nikon HN-28 metal screw in hood, into the main compartment rather than using an exterior Newswear Pouch. I still used my Newswear Pouch, however this was used to transport 2 Pocket Wizard Receivers, 1 Pocket Wizard Transmitter and a Calumet Swivel Adapter.

The tricky part was affixing the Bogen 3373 compact light stand. I did not want to attach the light stand using the lash-tabs at the bottom of the bag. After playing with a few options, I ended up inserting the the fully closed light stand upside down into one of the side mesh pouches. To keep the light stand in place I clipped a small carabiner to the rear top handle and a single leg section of the light stand. It held in place comfortably all day, and no one at airport security gave me a second look (I didn't expect any second looks at the airport, I fly with light stands externally all the time)

My "hit-the-ground-running" kit consisted on the following
2 - Canon EOS 1D bodies (one on each shoulder)
1 - Canon 14f2.8
1 - Canon 50f1.4 (on EOS 1D)
1 - Canon 85f1.8
1 - Canon 16-35f2.8 (on EOS 1Ds)
1 - Canon 70-200f2.8
2 - Nikon SB-28dx Speedlights
2 - Spare EOS 1D batteries
1 - Think Tank PeeWee Pocket Rocket (not pictured)
1 - Photoflex 22" white/gold LiteDisc reflector
1 - David Honl black/white Gobo w/speed strap(packed in LiteDisc)
1 - Bogen 3373 Compact Light Stand
1- Calumet Swivel Adapter
1 - Manfrotto 345 Table Top tripod w/extension pole
1 - Wein optical slave (used as a flash-foot on the Manfrotto 345)
2 - Pocket Wizard Receivers
1 - Pocket Wizard Transmitter
2 - Pocket Wizard to PC cords
2 - 4-packs of rechargeable "AA" batteries(for Nikon SB-28dx)
6 - 2-packs of AA batteries (for Pocket Wizard units)
1 - Small Roll of Gaffers Tape
1 - Ilford Anti-Stat Cloth (for lens cleaning)
1 - Set of Phillips Noise Canceling Headsets
1 - 60gb iPod Video
1 - Sony PSP w/Manhattan Portage Canvas Case
1 - Case of 4 UMD Disks (PSP Disks)

Another change in how I approached this shoot was to not travel with my laptop. Normally I fly with a 13" Apple MacBook, at times a 15" Apple PowerBook, but I have been seeking to shed this item due to weight and size restrictions. I know I need a laptop the majority of the time, however on this day trip I decided to shed the excess size and weight of a computer.

For entertainment on this day trip I brought a handheld Sony PSP with four movies on UMD disk. The UMD disks are smaller in diameter than the Canon EOS rear lens caps, and are roughly the same height as two DVDs (since the UMD disk is in a plastic protective case). I'd never used the Sony PSP before and really enjoyed it..........but that's for another post.

All in all for my day long trip to Philadelphia, two trips through TSA check points, packing the bag for flights on two regional jets and a few hours of packing and unpacking my kit on location while shooting I think this set up is fantastic. In the long run I can see this kit completely changing how I approach my short shoots.

Below are a few detailed photos of the kit in the bag and laid out with the bag. The images below also show some detail shots of the Newswear pouch with the Mountainsmith Day; the Manfrotto 345 and it's carry pouch attached to the Mountainsmih Day; the Domke lens insert and the Domke lens insert inside the Mountainsmith Day.

I have also added a few images from the engagement session this kit produced.

Happy Flying!

--Click Images To Enlarge Them--